One of the most common messages I get on Tumblr goes something like this: “What is your process for creating sigils? It can’t be as simple as scrambling up letters, so what’s the real secret?”
The truth is, there isn’t a secret. Making sigils is actually quite simple. Anyone can do it. Even for a complete newcomer, the process should take less time than a coffee break. While there are many, many ways to create sigils — magic squares, automatic drawing, grid overlays — the methods don’t really matter all that much.
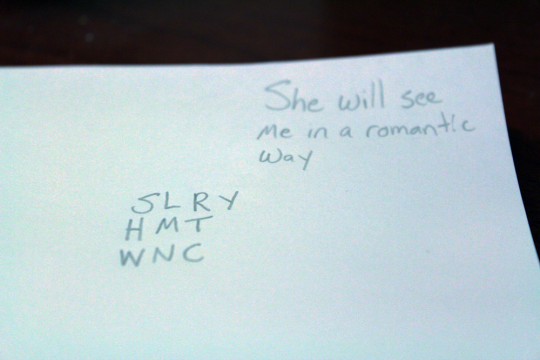
In this post, I’m going to show the step-by-step method I used for creating the most recent sigil I’ve published. It came at the request of a young woman who wanted to catch the romantic attentions of another female. It said simply: “She will see me in a romantic way.”
As you can see, I’ve gone with the most basic sigil-creation method here. I’ve written out the text, and I’ve isolated the consonants from the sentence. While there is an “occult” tradition behind this method, I wouldn’t get hung up on thinking that it’s the “right” way to make a sigil. It’s no better than any other method, it’s just easier to explain.
This first step is meant to abstract the coherent words into a less-coherent jumble of letters. The words stop being as meaningful, but the symbols behind the sigil’s intent remain. To keep things simple — and to speed up my next step — I arrange these letters into a grid.
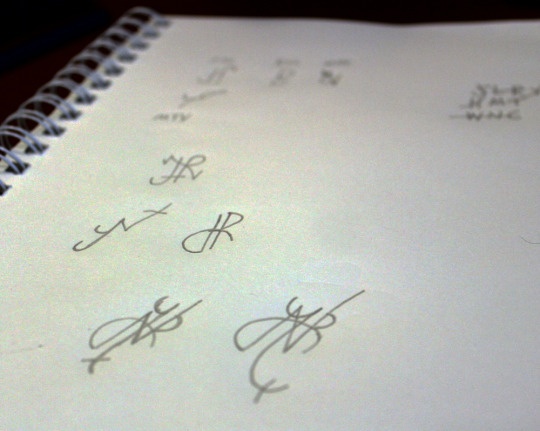
The next step is to abstract the remaining letters even further. Here, I’ve simply started combining elements of the letters together. I generally start by picking two letters from the grid of consonants, and start combining lines, curves, curls, dots, and other pieces of those letters together.
I try to keep these new symbols as simple as possible — four or five pencil strokes at most — because I’ll be further combining them in the next step.
From here, I generally play around with a few ideas, combining elements of symbols as I go. Sometimes these ideas come easily, as seen in the picture, but sometimes it can take pages and pages of sketches to find one I like. In particularly thorny situations, I’ll even start the entire process over from scratch, just to give myself a clean slate.
Once I’ve found a design I like, it’s time to start on the final design. Much like every other stage in the process, there is no one “right” way to do this. This is also the step where most people could happily stop. When the sigil looks and feels “right” to you, it’s done. The sigil is complete, if you want it to be.
In my case, however, I’m also making art for my website and social media. That means creating a version of the sigil that will (hopefully) catch other people’s eyes. There are countless ways to do this — charcoals, crayons, digital painting, markers — and I’ve experimented quite a bit over the years.
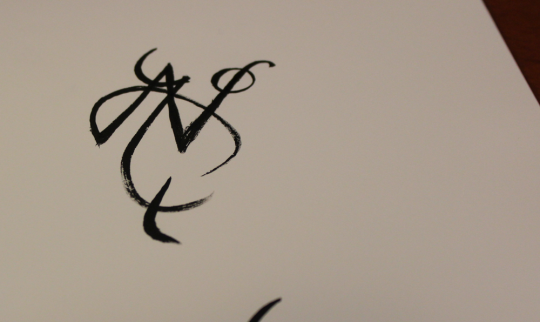
I also like to have an excuse to play with ink and brushes, so that’s how this one came together. I like that it’s a little unpredictable — with streaks and globs and splatter — and I’m always thrilled when a happy accident improves the design.
As you can see, I create tons of variations, tinkering with brush sizes, stroke direction, the amount of ink in the brush, and other stuff. While I liked some of these versions, none of them looked quite right. So, I kept going until I found one that did.
A few ink-soaked pages later, and this version was the clear winner. From here, it was just a matter of scanning the image in and doing a few technical things in Photoshop to make it look better in black and white. I add the text, the watermark, and … that’s it.
Here’s the finished version.
As you can see, there’s no great secret to making a sigil. Nor should there be. Sigils are about focusing intent, and even a few pencil scratches on notebook paper can become a perfectly wonderful sigil with the right intent behind it. Yes, some people (like me) like to do a little showing off with things they picked up from art class, but that should never be a barrier to creating your own personal sigils.
Questions? Thoughts? Leave a comment or drop me a message.
It is believed by some that charging a crystal or stone helps it get its energy back to its fullest. Some crystal workers do not believe charging is necessary, such as Naisha Ahsian in her article: Stop Charging Your Crystals… Naisha makes a very solid argument, though I find charging my crystals to be a bonding experience that not only strengthens my spiritual relationship with my crystals but also serves as a means to thank and honor them.
If you so choose to charge a crystal, first clear any unwanted or negative energy from the crystal or other stone by cleansing them.
With all methods of charging, first set your intention and state silently or aloud that you are doing this to charge your crystal for the best and highest good of all concerned. After your stone is charged, thank the Divine by whatever name you know it for assisting in charging your stone. Now proceed with the method of charging your crystal. Here are several methods you can use.
Sunlight or Moonlight Method: The sun’s and moon’s rays are very energizing, as well as energetically clearing. You can use this method to both clear and charge your crystals at the same time. Find a safe place and leave your crystal for 24 hours or more (up to a week) in sunlight and/or moonlight. Some crystals colors will fade in Sunlight, so those should be charged only in moonlight. Some stones that will fade in the sun are amethyst, celestite, kunzite, opal, and turquoise. If you have any doubts at all, only use moonlight charging. This can also clear the stones of unwanted energies at the same time if you set your intent to do that as well.
Charging Stones: Some stones can be very energizing to other stones. In most cases, they can also clear their energy. That makes using charging stones a handy method of charging a crystal. Simply place your crystal needing charging on a cluster or larger piece of a stone that can charge others such as selenite, amethyst cluster, quartz cluster, or carnelian. Leave your crystal there for 24 hours or until it feels like it is at full energy.
Charging Grid: This is a variation on using charging stones. Take a group of quartz crystals (4 to 8 or more) and point them inward in a circle. Place the crystal or stone you want to be charged in the center of the circle and leave it there to charge for 24 hours or more.
Plant Method: Place your crystal among the leaves of a growing, healthy plant for 24 hours or more to charge it. This is said to bring growth energies to the charged crystal.
Burial: This method is good for grounding stones in particular, such as most any black stone, smoky quartz, red jasper, and others. Bury the stone in the ground for a week or more to charge it. This can also clear unwanted energies at the same time. Be sure when you bury your stone that you mark the area so you know where to find it when the week is up.
Use Energy: This can be called lots of things. When people use “energy” to charge a crystal, what they mean might not always be exactly the same. Directing one’s own energy into the object can refer to the act of imagining your aura/prana/chi/qi/spirit entering the crystal. Many people claim to be able to feel this occur. As it is an intuitive process, you may wish to rely on your own instincts or those of a mentor in order to determine if you are doing this properly.
Unconventional Methods: Get creative with charging! Some individuals charge their crystals by simply kissing them!
Whichever method you choose or come up with, the exact length of time needed for charging varies according to the state of the crystal or stone to begin with. Trust your intuition and higher self to lead you to the best methods and lengths of time for you and the stone.
This cleansing process isn’t a ‘physical’ cleaning with soap and water, but intended to cleanse the stone of its stored energies, both good and bad. Crystals that you work with or keep with you often should be cleansed more regularly than the ones that may simply be sitting on your desk or in a box. However, it is nice to give all of your crystals a nice energetic tune-up every now and then. Use your intuition on how often your crystals need a little extra care. Sidenote: You should always cleanse your crystals when you first obtain them.
In this post I list the most common RISK and NON-RISK methods for cleansing.
⚡RISKY CLEANSING METHODS⚡
💧WATER💧
Suitable crystals can be left out in the rain, soaked in a bowl, taken with you in the shower/bath, or simply rinsed under the facet if you’re in a hurry.
Water is one of the simplest cleansing mediums, however certain crystals are too sensitive for water. I highly suggest only using this method if you know exactly what you are doing.When in doubt, don’t. Check my post on Crystal Caution to know what crystals to avoid cleansing in this way.
🍚💧SALT WATER💧🍚
Suitable crystals can be left to soak in seawater or water mixed with sea salt. Cooking salt can also be used if sea salt/water is not available. You should fill a glass bowl (not metal) about half to one-third full and place your crystals so they are fully submerged in the salt water for anywhere between 1 to 24 hours. Many people leave them in salt water overnight but a crystal that needs a much deeper and more thorough cleansing can be left for up to 1 week. You should thoroughly rinse your crystals in cool running water after spending time in salt water to remove any remaining salt. After use, the salt water must be flushed away and never re-used because it will have absorbed negative and unwanted energies.
Please be aware that this method must be avoided for certain crystals as it can have an adverse effect on them and even change their appearance and properties! I highly suggest only using this method if you know exactly what you are doing.When in doubt, don’t. Check my post on Crystal Caution to know what crystals to avoid cleansing in this way.
🍚DRY SALT🍚
Another salt method is to half-fill a glass bowl with sea salt (or cooking salt) and place your crystals directly into the salt. Either bury them into the dry salt or leave them on the surface. They should be left in the salt for several hours, overnight or for several days. Your crystals should then be rinsed thoroughly under cool running water to remove any remaining salt. After use, the salt must be thrown away and never re-used because it will have absorbed negative and unwanted energies.
Again, take care when placing your crystals directly onto dry salt as the salt can have an adverse effect on certain crystals, as explained above. I highly suggest only using this method if you know exactly what you are doing.When in doubt, don’t. Check my post on Crystal Caution to know what crystals to avoid cleansing in this way.
🚫🍚NON-CONTACT SALT🍚🚫
This is considered the safest salt-cleansing method and should be used where the crystals may otherwise be damaged by direct contact with salt. This is also a good method if you are cleansing gemstones found in jewelry or gems surrounded by metal.
First, fill a glass bowl half to two thirds full with dry sea salt (or cooking salt). Then place a smaller glass container or shallow drinking glass and half-bury this glass into the salt. You can then place your crystals directly into the empty glass which is sitting half buried in the dry salt. The salt will still be able to draw out the stored energies within the stones but this method will take longer to work than direct contact with salt.
You may also pour just enough water (preferably pure, distilled or mineral water) into the smaller glass container, just enough to cover the crystals. This will protect them and prevent direct ‘salt exposure’ or ‘salty air’ from causing any corrosion or adverse effects to any metals or other fittings that may surround the gems.
The used salt should be thrown away and never re-used.
Again, bear in mind that certain crystals should not be left to soak in water. I highly suggest only using this method if you know exactly what you are doing.When in doubt, don’t. Check my post on Crystal Caution to know what crystals to avoid cleansing in this way.
👌SAFE CLEANSING METHODS👌
💎CRYSTAL DRUSE, BED, GEODE OR CLUSTER💎
One of my favorite techniques. All crystals can be cleansed safely by placing them inside an Amethyst Geode Cave overnight or for 24-48 hours. An Amethyst Druse, Cluster, or Bed can also be used in the same way.
It is believed by some that a Clear Quartz Geode, Bed or Cluster provides a faster cleansing process than Amethyst, but both methods are equally as effective.
Simply place no more than a few crystals onto the crystal points and leave for anything up to 24-48 hours. These crystal cluster formations (both Amethyst and Quartz) have the ability to absorb the energies contained within crystals, neutralize the energies and then release ‘good’ energy from the cluster back into the crystals being cleansed, so they can effectively cleanse and energize at the same time.